


Be sure to visit "Ream and Run - the state of the art" regarding this radically conservative approach to shoulder arthritis at this link.
Also be sure to see the the ream and run essentials and this Video. of the shoulder function of some of the patients having had a ream and run.
As we discussed in another post today, failure of the polyethylene glenoid component is the most common complication of total shoulder arthroplasty. Concern about glenoid component failure leads surgeons to place long-term activity restrictions on their patients. In an effort to meet the demands of individuals wishing for high levels of physical activity after shoulder arthroplasty without concern about glenoid component failure we have explored the application of non-prosthetic glenoid arthroplasty with humeral hemiarthroplasty – the ream and run procedure. This procedure is technically exacting and requires the vigorous and full participation of the patient during what can be a lengthy rehabilitation process.
We have summarized some of the ream and run essentials here.
With the indispensable help of Steve Lippitt, the wonderful orthopaedic shoulder surgeon/artist, we share with you some of the 'pearls' regarding this procedure.
Once more, the Ream and Run glenohumeral arthroplasty is a technically demanding shoulder reconstruction that obviates concerns regarding failure of plastic or cement. Its objective is to manage the locally increased contact pressure that comes from glenoid wear in shoulder arthritis.
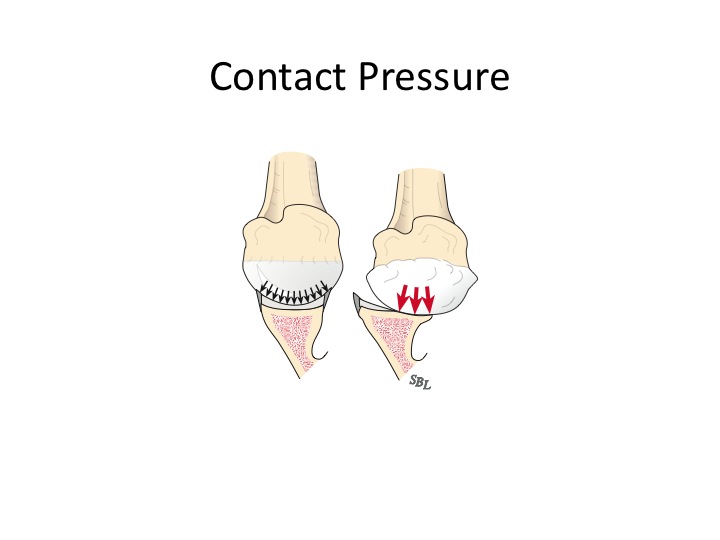
The principle of the ream and run is to increase glenohumeral stability and reduce the local contact pressure by restoring a smooth, concentric biological glenoid surface that can remodel with fibrocartilage over it.


Informed consent for this procedure begins with a detailed review with the patient of a handout and web resources, making sure that prospective patients understand clearly the risks and alternatives of this procedure as well as the requirement for a concerted rehabilitation effort on their part.
Preoperative planning includes a detailed history and physical examination, assessment of rotator cuff and neurologic function and high quality plain radiographs (anterior posterior view in the plane of the scapula and true axillary view).
We view the procedure as consisting of the following steps: (1) surgical approach, (2) humeral preparation, (3) glenoid preparation, (4) humeral prosthesis selection, (5) humeral prosthesis fixation, (6) soft tissue balancing, and (7) rehabilitation.
(1) Surgical Approach-After administration of prophylactic antibiotics. While a number of difference choices have been considered, we currently use Ceftriaxone and Vancomycin. If the patient is allergic to cephalosporins, we use Clindamycin. After a thorough skin preparation, expose the shoulder through a long deltopectoral incision, incising the subscapularis from its origin and capsule from the anterior inferior humeral neck while carefully protecting all muscle groups and neurovascular structures.
· Select antibiotic prophylaxis in consideration of the observation that P Acnes and Coagulase Negative Staph are the organisms most commonly found in failed shoulder arthroplasties.
· Position the patient in a beach chair position with the shoulder at the edge of the table and the arm free.

· Carefully prepare and drape skin excluding exposed skin from the surgical field.
· Incise skin along a 10-centimeter line from mid clavicle across the coracoid process.
· Split the deltopectoral interval and clavipectoral fascia, preserving the coracoacromial ligament.
· Incise the subscapularis tendon from its origin, maximizing tendon length and preserving the long head of the biceps.
· Incise the capsule from the anterior and inferior humerus, carefully protecting the nearby neurovascular structures
· Frequently irrigate the wound using Vancomycin or Vancomycin + Cephalosporin in saline throughout the case to reduce the risk of contamination.
(2) Humeral preparation-Gently expose the proximal humerus; resect the humeral head at 45 degrees to the orthopaedic axis while protecting the rotator cuff; and vigorously excise all humeral osteophytes.
· Insert a broad flat retractor (i.e. Darrach) in the glenohumeral joint.
· Gently deliver the proximal humerus with a combination of external rotation, extension and adduction of the humerus
· Through a starting point on the humeral articular surface near the supraspinatus insertion, ream the humeral medullary canal to diameter where the distal reamer just begins to engage the endosteal cortex

· Using this reamer as an indication of the orthopaedic axis of the humerus, resect the humeral head at a 45 degree angle to this axis taking care to protect the rotator cuff; the cut surface should face 30 degrees posterior to the transcondylar axis of the elbow.
· While carefully protecting the neurovascular structures, completely resect the osteophytes from around the humeral neck.
· Preserve all resected bone in a sterile covered container on the surgical field.
(3) Glenoid preparation-After performing an extra-labral capsular release remove any residual cartilage, drill the glenoid centerline and ream the glenoid to a single concavity.
· With the upper extremity supported on a stand, place a broad retractor behind the glenoid to retract the proximal humerus posteriorly

· Incise the capsule from the labrum, leaving the labrum attached to the glenoid. If the preoperative axillary x-ray shows posterior subluxation, stop the release just before the inferior glenoid.

· If the shoulder is tight, but not posteriorly subluxated, perform a 360-degree extralabral periglenoid release.

· Curette any residual cartilage from the surface of the glenoid.

· If this exposes a biconcavity, bur down the ridge between the two concavities.

· Locate the position of the hole for the nub of the glenoid reamer: midway between the front and the back of the glenoid and slightly above the superior/inferior midpoint.


· After drilling this hole, ream the glenoid to a single concavity.

We prefer a 58 mm diameter reamer in all but very small shoulders for use in conjunction with a 56 mm diameter humeral head in that this combination optimizes load transfer.

· In reaming, prioritize bone preservation (i.e. minimize bone removal) over ‘normalization’ of the glenoid version.

(4) Humeral prosthesis selection-Select a humeral prosthesis that fits the medullary canal and that provides the desired mobility and stability of the arthroplasty.
· Using instruments of a diameter equal to that of the largest medullary reamer that was fully inserted into the medullary canal, broach the proximal humerus
· Select trial humeral heads of a diameter of curvature 2 mm smaller than that to which the glenoid was reamed (56 mm in almost all cases).
· Select the trial humeral head with a height that allows 60 degrees of internal rotation of the arm abducted to 90 degrees and just less than 50% posterior subluxation of the humeral head on the glenoid.
· Check to be sure that there is no unwanted contact between bone at the medial or posterior aspect of the humerus with the glenoid.


· If excessive posterior subluxation occurs when the arm is flexed, consider an offset (eccentric) humeral head prosthesis with the larger aspect anteriorly.

· Select the final prosthesis based on this trialing and assemble it on the back table using new sterile gloves

(5) Humeral prosthesis fixation-Fix the humeral component using impaction autografting.
· Irrigate the medullary canal with antibiotic-containing saline solution
· Using morcelized bone harvested from the resected humeral head and osteophytes, impact autograft into the canal using an impactor of the same geometry as the definitive humeral stem. Continue impaction until the impactor becomes snug when it is one centimeter above the fully seated position.

· Make six drill holes through solid bone at the margin of the humeral neck cut, beginning at the top of the lesser tuberosity.
· Pass #2 non-absorbable sutures through each of the six holes.
· Irrigate the medullary canal with antibiotic-containing saline solution
· Using sterile gloves and insertion tools, seat the definitive prosthesis so that it achieves the desired register with the reamed glenoid.

· Check again to be sure that there is no unwanted contact between bone of the medial or posterior aspect of the humerus with the glenoid (Pooh corner and open book as described above).
(6) Soft tissue balancing-After the definitive humeral prosthesis is in place, assure the desired balance of mobility and stability. If there is excessive posterior translation, consider a rotator interval plication.
· Examine the range of flexion (ideally 150 degrees), the range of internal rotation of the abducted arm (ideally 60 degrees), the posterior translation (ideally just less than 50% of the width of the glenoid, and 40 degrees of external rotation with the subscapularis approximated to its insertion.


· If the shoulder allows too much posterior translation consider a humeral head with greater height or anterior offset (eccentricity)
· If the shoulder continues to allow too much posterior translation (drop back on elevation) consider a rotator interval plication.


· If the shoulder is too tight, consider additional soft tissue releases or downsizing the humeral head height
· Repair the subscapularis tendon securely using the previously placed six sutures.

Post operative x-ray should show a nicely centered humeral head.

===
To see a YouTube video on how the ream and run is done, click on this link.
=====
To see our new series of youtube videos on important shoulder surgeries and how they are done, click here.
Use the "Search" box to the right to find other topics of interest to you.
You may be interested in some of our most visited web pages arthritis, total shoulder, ream and run, reverse total shoulder, CTA arthroplasty, and rotator cuff surgery as well as the 'ream and run essentials'